一、服务端 ocserv
1、安装
1
2
| sudo apt update
sudo apt install ocserv
|
2、编辑配置文件
1
2
3
4
5
6
7
8
9
10
11
12
13
14
15
16
17
18
19
20
21
22
23
24
25
26
27
28
29
30
31
32
33
34
35
36
37
38
39
40
41
42
43
44
45
46
47
48
49
50
51
52
53
|
auth = "certificate"
tcp-port = 999
udp-port = 999
server-cert = /etc/ocserv/cert.pem
server-key = /etc/ocserv/cert.key
ca-cert = /etc/ocserv/ca-cert.pem
max-clients = 5
max-same-clients = 5
mobile-dpd = 1800
try-mtu-discovery = true
default-domain = v.ilil.tech
ipv4-network = 10.0.1.0
ipv4-netmask = 255.255.255.0
dns = 114.114.114.114
dns = 8.8.8.8
route = 10.0.0.0/24
|
3、重启服务端
1
| sudo systemctl restart ocserv
|
4、创建连接账号(可选)
当使用 #auth = "plain[passwd=/etc/ocserv/ocpasswd]" 的认证方式时才需要这一步
1
| sudo ocpasswd -c /etc/ocserv/ocpasswd 你的用户名
|
二、配置网络设置
1、开启 IPv4 转发
1
2
| sed -i '/net.ipv4.ip_forward.*/d;$a\net.ipv4.ip_forward = 1' /etc/sysctl.conf
sudo sysctl -p
|
若不生效则可能需要重启
2、配置防火墙
1)安装防火墙(若没有)
2)放行 SSH
3)设置防火墙规则
前两条命令中的 IP 为配置 ocserv 时设置的 VPN 分配网段地址
后两天命令放行 ocserv 服务所使用的端口
1
2
3
4
| iptables -t nat -A POSTROUTING -s 10.0.1.0/24 -o eth0 -j MASQUERADE
iptables -A FORWARD -s 10.0.1.0/24 -j ACCEPT
iptables -A INPUT -p tcp -m state --state NEW --dport 999 -j ACCEPT
iptables -A INPUT -p udp -m state --state NEW --dport 999 -j ACCEPT
|
3、持久化 iptables 规则
1
2
| apt install iptables-persistent
netfilter-persistent save
|
但是我实际测试发现服务器重启之后防火墙规则还是会失效,就写了一个脚本设置防火墙规则开机执行(不要忘记给脚本设置 x 可执行权限)
脚本如下:
1
2
3
4
5
6
7
8
9
10
11
12
13
14
15
16
17
| #!/bin/bash
iptables -t nat -A POSTROUTING -s 10.0.1.0/24 -o eth0 -j MASQUERADE
iptables -A FORWARD -s 10.0.1.0/24 -j ACCEPT
iptables -A INPUT -p tcp -m state --state NEW --dport 999 -j ACCEPT
iptables -A INPUT -p udp -m state --state NEW --dport 999 -j ACCEPT
netfilter-persistent save
systemctl restart ufw
|
将脚本移动至 /etc/init.d 目录并赋予执行权限
1
2
3
| mv shell.sh /etc/init.d/
cd /etc/init.d/
chmod +x shell.sh
|
设置脚本链接并配置自启动
1
2
3
4
| cd /etc/init.d/
ln -s /etc/init.d/shell.sh /etc/rc5.d/S99shell
update-rc.d shell.sh start 99 5
update-rc.d shell.sh defaults 99
|
三、配置证书登录
1、生成自签 CA 根证书
1
2
3
4
5
6
7
8
9
10
11
12
13
14
15
| certtool --generate-privkey --outfile ca-key.pem
cat << _EOF_ >ca.tmpl
cn = "VPN CA"
organization = "HIMCloud,Inc."
serial = 1
expiration_days = -1
ca
signing_key
cert_signing_key
crl_signing_key
_EOF_
$ certtool --generate-self-signed --load-privkey ca-key.pem \
--template ca.tmpl --outfile ca-cert.pem
|
2、生成客户端证书
1
2
3
4
5
6
7
8
9
10
11
12
13
14
| certtool --generate-privkey --outfile user-key.pem
cat << _EOF_ >user.tmpl
dn = "cn=TechPANG,O=HIMCloud,UID=tech"
#if usernames are SAN(rfc822name) email addresses
#email = "username@ilil.com"
expiration_days = 365
signing_key
tls_www_client
_EOF_
certtool --generate-certificate --load-privkey user-key.pem \
--load-ca-certificate ca-cert.pem --load-ca-privkey ca-key.pem \
--template user.tmpl --outfile user-cert.pem
|
3、生成 p12 客户端证书
客户端实际连接时使用的就是 p12 证书
1
2
3
4
| certtool --to-p12 --load-privkey user-key.pem \
--pkcs-cipher 3des-pkcs12 \
--load-certificate user-cert.pem \
--outfile user.p12 --outder
|
⚠️注意:这里生成的 p12 证书实测只能 Windows 设备导入,在 macOS 和 IOS 上导入该证书始终提示密码错误无法导入,要在苹果设备上导入 p12 证书需要在 macOS 的钥匙串中重新导出一次 p12 证书,在导出的过程中重新设置证书密码后才能在其他苹果设备上导入,下面讲解该流程执行步骤:
将上一步生成的客户端证书的私钥文件通过如下命令导入到 macOS 的钥匙串中:
1
2
|
security import user-key.pem -k ~/Library/Keychains/login.keychain
|
导入后如下所示:

在要导出的证书上右键选择导出:
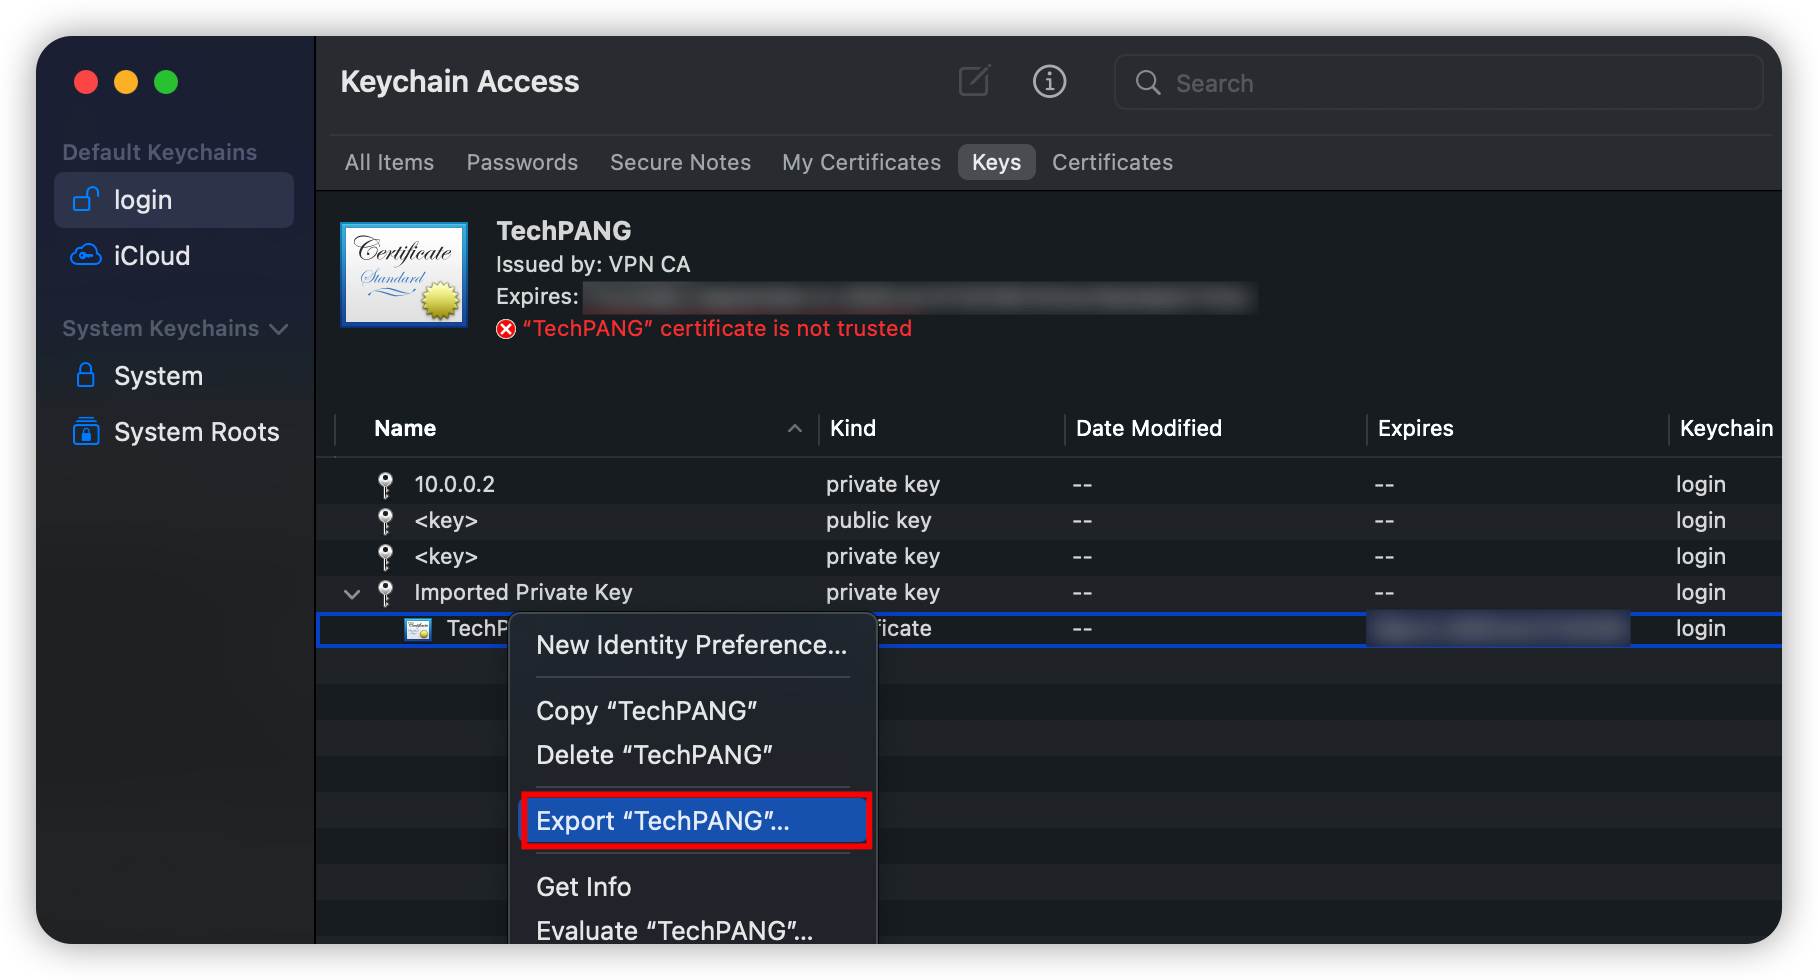
选择导出 p12 格式的文件:

点击保存后要求设置证书密码,按需设置就行,因为系统安全设置无法在设置密码时截图,就不放图片了,由此导出的 p12 证书便可使用刚刚设置的密码导入到其他苹果设备上了。
4、撤销客户端证书(可选)
1
2
3
4
5
6
7
8
9
10
| cat << _EOF_ >crl.tmpl
crl_next_update = 365
crl_number = 1
_EOF_
cat user-cert.pem >>revoked.pem
certtool --generate-crl --load-ca-privkey ca-key.pem \
--load-ca-certificate ca-cert.pem --load-certificate revoked.pem \
--template crl.tmpl --outfile crl.pem
|
After that you may want to notify ocserv of the new CRL by using the HUP signal, or wait for it to reload it.(这一步还没搞明白)
When there are no revoked certificates an empty revocation list should be generated as follows.
1
2
3
| certtool --generate-crl --load-ca-privkey ca-key.pem \
--load-ca-certificate ca-cert.pem \
--template crl.tmpl --outfile crl.pem
|
ocservKeys.zip
参考:
Debian 9 配置 OpenConnect(兼容Cisco AnyConnect)
ocserv manual
Mac下导入pem格式的证书或私钥到钥匙串中